Thursday, April 25, 2013

A.T. Near Roanoke: McAfee Knob and Tinker Cliffs

Week 2 of my tour of the Roanoke Appalachian Trail Club's section of the Appalachian Trail started near (guess where?) Roanoke.  I had the pleasure of again hiking with Ed and Mike, both of whom I had met the week before on my first RATC hike, and we added John to this hike.
Climbing from the parking lot on Rt. 311

It is hard to imagine another section of trail that the RATC covers that could be more spectacular than this hike.  In fact, I haven't found any section of trail anywhere in Virginia more scenic than this one. While everyone seems to say that Mt. Rogers is the best hiking in Virginia, I think McAfee's Knob and Tinker's Cliffs are the best.  In fact, Virginia has a rendering of McAfee Knob on its A.T. license plate.

It is said that McAfee Knob is the single most photographed spot  on the A.T., and I can see why. It is really a breathtaking spot.

This is also a very popular hike, and, though we didn't see many folks on the day we hiked, the wear on the trail was evident.  A Tuesday in mid-February is a good time to see the sights without encountering many folks.

We left the large parking lot on Route 311 at 9:12 AM, and 27 minutes later passed the first of three A.T. shelters we would see on this short section of trail, the John's Spring Shelter.  Mike told me about the RATC's problem a couple of years back with a young fellow from Lexington who liked this area so much he basically moved in on weekends and kept his tent up when he was back home.  They had to drag his tent and all of his stuff back to the parking lot, including quite a bit of electronics.
Normal clouds look spectacular here.
The ridge to the left of the rock was our route towards Tinker Cliffs.

At McAfee, with North Mountain in the background.
An hour into the hike we were at the Catawba Shelter, which also has a nice campsite nearby.  From Catawba it is a 2 mile hike to McAfee, and a 1000 foot elevation gain, which calculates out to about a 9% climb.  And 50 minutes later we were at the edge of McAfee Knob.  You can't just pass by, so we stopped, snacked, and snapped a few photos.  And I can confidently say that at 11 AM on February 12th, 2013, I was photographed for a shot that I will hold on to for the rest of my life.  And I will always state, "photos do not do justice to this view."

We projected to have a long hike, so we only stayed here for 10 minutes.  And my colleagues told me that the view from Tinker Cliffs is actually better!  So I was anxious to see what was next.

We took a short detour through a spot with large rocks called Devil's Kitchen before dropping to the Campbell Shelter at just under 5 miles.  We snacked briefly here, and snacked again at a rocky spot with a nice view to the east at the 7.25 mile mark.  At 8 miles we dipped to meet the Brickley Gap Trail, which bypasses Tinker Cliffs in favor of a straight shot to the Lambert's Meadow Shelter with little of the elevation gain climbing to Tinker.
But we had purchased the ticket for the full ride on this hike, and climbed about 850 feet over the next mile-and-a-half to the Cliffs.  And the view from the cliffs is at least the equal of the view from McAfee Knob.  Better, I think, because you get a longer view down the valley.
The trail sometimes hugs the edge of the cliffs.

Another tourist photo!

Hiking along the cliffs' edge.

The view southeast from Tinker Cliffs.
McAfee Knob is the highest point on the left side of the photo.
From the cliffs it was a little under a mile to the Andy Layne Trail and another 2.9 miles to the car, parked at the trailhead parking lot on Route 779.  The end result was a hike only about 350 feet longer than the hike the week before, which is pretty amazing over such a long hike.  The bigger difference is the additional 750 foot elevation gain in this hike.

Bottom line: This is quite a hike!  Highly recommended.


Hike Details.
PATC Difficulty Factor 323.9
Distance:  13.4 miles
Total Time: 6 hours 40 minutes.
Lowest point: 1333 ft.
Highest point: 3225 ft.
Total uphill: 3929 ft.

Monday, April 22, 2013

Water Purification on the Trail

Last weekend, some of the older scouts in my son's troop participated in a "District Backpackoree," which was essentially a multi-troop camping event in which the troops backpacked to different spots in a county park and stopped at activity stations along the way.

Although I could not participate, I was asked to help put together a presentation these boys would make about hydration while backpacking.  A patrol would be given coordinates to the boys' location, and then receive information about different types of water purification systems from these older scouts.

The week before I had hiked with a couple of recent PCT through-hikers and discussed water purification.  I learned, for example, their opinion that purification is much more important on the PCT than on the AT, because there is so much more range land out west.  Having cattle nearby can create for some nasty bugs in the water, while the Appalachian Trail often stays further away from development.

As a hiker who cannot afford to miss work because I ingested some bug out on the trail, I am not going to take a chance on the purity of my water.  My goal is to bring plenty of water, but there are times when I do not bring enough, such as when it is hotter on the trail than I anticipated.  This happened to me recently on a hike in the Three Ridges Wilderness.  Though I filled from a spring on the trail I did not drink the water, as my Steri-Pen did not work correctly.  And though my friend said that he would not filter at this spring, I wasn't going to take the chance.

So the timing was right to look again at some options for purification on the trail.  Here are some options I considered.  There are definitely other options out there as well!  


Lifestraw
Lifestraw shown with packaging.
Tennis ball included to give idea of Lifestraw's size.
The LifeStraw is a small tube with specialized water filters inside. Place one end in unfiltered water (a glass, water bottle, river, or puddle!), and suck the resulting clean water up through the top. A Lifestraw is used by one person only and is not to be shared.  The filtration process is powered by suction, similar to using a conventional drinking straw, and filters up to 264 gallons of water, which the company claims equals a person's intake in a year. 

LifeStraw removes a minimum of 99.9% of waterborne protozoan parasites including giardia and cryptosporidium.  This product was chosen by CNN as one of “Ten Ideas That Will Change The World” and was Time Magazine’s “Best Invention of the Year” in 2005.  It costs $22 from Amazon.

After reading raves about this product, I decided to pick one up for myself.  It is incredibly lightweight!  It is going in my hiking pack and is my new backup hydration system.  With this, I can collect water in a widemouth container like a Nalgene, then suck the water through the Lifestraw to take in purified water.  It could not be easier, though the sucking may be hard.  And, as this video shows, you can drink some really nasty water through this unit.  Video.

A great gift for hiking friends!

Pros: Easy to use.  Very lightweight – weighs 2 ounces.  Needs no batteries.  Has no moving parts.  Easy to clean.  No need to wait for purification or pumping.

Cons: Should not ever be dropped.  Cannot store filtered water for later use or for cooking.  Cannot be shared with others.  It does not filter heavy metals or desalinate.  Does not last forever - the filter expires after 3 years.  

Steripen
I currently own my second Steripen, which kills the bad critters using an ultraviolet lamp.  My first model never worked very well, and the company sent me a second model for free after I returned the one I bought a second time.  I am pretty sure I spoke directly with the company's president after that experience!  So they get top ratings for customer service.  My current model is the Steripen Adventurer Opti.   The downside of this model is that it takes expensive CR123 lithium batteries, and they seldom seem to work!

According to one reviewer on REI: 

The CR123 lithium batteries start at 3.25 volts. They are "dead" at 2.9 volts. Actually, they still have 90% of their power left but the electronics in the SteriPen are designed to only use 10% of each battery.  

This would explain why my unit always seems to work when I test it in my kitchen, but does not work on the trail.  But I cannot confirm the accuracy of this statement.

The manufacturer claims the Steripen purifies 16 oz. in 48 seconds and 32 oz. in just 90 seconds. The UV lamp provides up to 8,000 one-liter treatments.

Pros: Easy to use.  Lightweight – weighs 2 ounces.  Easy to clean.  No need to wait for purification or pumping.  Kills viruses in addition to bacteria.

Cons: Should not ever be dropped.  Does not work for water with many particles floating – requires another filter. Batteries need to be checked regularly.  All electrical devices can fail.  Some models use expensive batteries and cannot use rechargeable batteries.

Pumps
Frankly, I think they are too slow and have way too much going on with hoses everywhere and parts to put together and cleaning and back flushing. They are good for larger groups, such as scouts, as it is cheaper to have one big pump than to issue Lifestraws to every hiker.  They are often the heaviest treatment method, and weight can be distributed among the entire group.

Tablets
I think Tablets take too long to make water available. They can be good to have as a backup system as they are very lightweight.  There are also systems using drops of a mix of liquids, which work quicker (tablets need to dissolve), but cannot be mixed in advance.

Sawyer Squeeze
Pros:  Very lightweight.  Filter fits platypus soft bottles and soda bottles.  

Cons: Freezing may harm the filter, so not recommended for winter use.  There are also complaints online about the bag that comes with this product, but the thru-hiker mentioned above loves this product and uses it with a standard plastic soda bottle.  I have never tried one, so I list it here as another potential option for folks.  

Friday, April 19, 2013

A.T. Near Roanoke: Andy Layne Trail to Daleville (U.S. 220)

This is an account of a hike that took place back in early February.  I have taken a lot of hikes since then, so this seems like a long time ago, but it is a really good hike, so I wanted to get this recorded.

I drove down from Charlottesville to meet a couple of members of the Roanoke Appalachian Trail Club, just off of Interstate 81 near where the Appalachian Trail crosses the interstate.  The club had scheduled a couple of earlier A.T. mid-week hikes that I had hoped to experience, but the Blue Ridge Parkway had been closed by snow and ice.  Looking back, it is amazing that we only had three participants - the hike leader, the RATC President, and me - because subsequent hikes grew in popularity to the point where we ended up with a large number of participants.

Ed crosses the Little Catawba.
We waited until 9 AM as there was another possible hiker joining us, but after 9 jumped in the car and headed to the trailhead.  We started out taking the Andy Layne Trail, dropping from 1540 feet at the parking lot to 1380 feet as we crossed Little Catawba Creek and passed some potential campsites.  Not sure this is a great spot to camp,  as one of my companions told me he would never drink water from this creek, even treated, because there is too much agricultural and industrial activity in the area.

The water wasn't the only thing sketchy in this part of the hike.  The bridges over the Little Catawba looked a lot like a Jenga game ready to tumble!  But everything held and we crossed without incident before ascending 1200 feet over the first 3 miles of the hike.  Some of the ascent was steep over brief periods, including one section (1.8 miles into the hike) about 350 feet in length that was a 34% incline.

The Andy Layne Trail ends after 3 miles at an elevation of 2567 feet where it meets the Appalachian Trail.  This is the highest elevation on this hike.  If we headed southbound on the A.T., we would keep climbing up to Tinker Cliffs.  On this hike, we turned northbound on the A.T., descending to the Lambert's Meadow Shelter.  Just beyond the shelter are some nice campsites along what looks to be a reliable stream, and an intersection with the Brickey's Gap Trail.  This blue blazed trail meets up with the A.T. on the other side of Tinker Cliffs, which might be useful for a hiker with bad knees.

From here, we climbed to a ridge that we followed until descending to our cars on U.S. 220.  The ridge top was replete with great views on both sides.  Views to our left were generally of farm lands, while views to our right took in the Carvins Cove Reservoir, which supplies Roanoke with its drinking water.  The most famous local viewpoint is Hay Rock, which is unfortunately marred by graffiti and a large chair.  Mike, the RATC President, told us how the club has to spend quite a bit of time and resources trying to keep this rock clean from graffiti.

After passing under some large power lines, we began our descent and reached the cars after 13.3 miles.  We parked in a large and crowded park-and-ride lot that was directly on the A.T. when I hiked a small portion  of this trail 20 years ago.

Overall, this is a beautiful section of trail, and would be the nice ending to a multi-day hike on the A.T. that includes McAfee Knob and Tinker Cliffs.  I would see those landmarks on my next hike.


Hiking Time/Distance Breakdowns:
Andy Layne Trail to Appalachian Trail: 1 hour, 30 minutes.  3.0 miles
ALT/AT Intersection to Lambert's Meadow Shelter: 17 minutes.  0.7 miles
Lambert's Meadow Shelter to Hay Rock: 2 hours, 31 minutes. 5.6 miles
Hay Rock to U.S. 220: 1 hour, 43 minutes. 3.9 miles

My GPS Data:
PATC Difficulty Factor295.6
Total Altitude Gain3288feet
Total Distance13.29miles
Low Point1152feet above sea level
High Point2574feet above sea level
Time of Hike6:20hours: minutes


Sunday, April 14, 2013

Climbing the A.T. through 3 Ridges Wilderness: April 10, 2013

I skipped my normal hike with the Roanoke ATC this week so I could catch up with my hiking friend Marit, with whom I hadn't hiked in a long time, but is a veteran of hikes with me on the Wild Oak Trail, the Jones Mountain Trail, and Ramsey's Draft, among others.  One of my hiking companions had wanted to hike 3 Ridges, but wanted to do it with others because she found it to be an intimidating hike.

I have hiked it several times, dating back to before its inclusion in the federal wilderness system. Most recently, I had hiked the A.T./Mau-Har Loop back in May of 2010, on a cool and overcast day.  (Description here.)  Three Ridges is probably the most remote and possibly the most beautiful hike easily accessible to Central Virginia. 
With Barbara, Marit, and Gracie the dog at the A.T. Parking Lot
on Route 56 before climbing Three Ridges.
Marit was hiking with her close friend and Pacific Crest Trail hiking partner, Mark, and with Barbara, who had never hiked this section before.  We dropped a car at Reid's Gap on the Blue Ridge Parkway near Wintergreen Ski Resort, and then left my car at the parking area on Route 56 near Crabtree Falls.  I left it open whether I would hike with them the entire way back to Reid's Gap or return to my car via the Mau-Har Trail, as I had done in June, 2010.   Though I needed to get back to Charlottesville by 4:30 to get my son to a baseball game, I figured I could do this since the last time I had done the 13 mile loop in 5 hours and 12 minutes.
Heading uphill after the Tye River crossing.
We started on the trail at 8:20 and were quickly over the swinging suspension bridge crossing the Tye River. But we had a glitch nearly right away.  Marit realized by 8:33 that she had left her keys in my car, and needed to return to get them.  Barbara and I waited on the trail and talked pros and cons of different types of trekking poles while Marit and Mark returned to the car.  We were moving again by 8:55.

We saw another hiker Marit knew - a guy who sometimes hikes with the PATC, and a father with his two young daughters, taking them out on their first overnight backpack.  And, an hour after restarting our hike, we reached the Harper's Creek A.T. shelter.  The area has some really nice campsites - tremendous for boy scout troops as they are far away from the shelter and shielded by a noisy stream.  I hope to get my son's troop out here in the next few months.

The trashed inside of the shelter.
Unfortunately, a recent shelter user had left the area around the shelter completely trashed.  there was food left all over the floor of the shelter and on the picnic table, and an opened can of chicken left in the fire pit.  This person had to have been a very recent visitor, as I don't think the animals would have left this food very long.

While I pondered how karma would plot revenge on this vile person, Mark set about cleaning up the mess.  This is a passion of his, as he told me about bringing out large bags of garbage while on his A.T. through hike several years back.  Mark believes in setting the proper example, as the trail belongs to all of us.  I lean more towards implementing an iron brand with the Leave No Trace logo on the ass of anyone I come across who performs such acts.
Because Barbara was worried about how easily she could climb Three Ridges, and I needed to make time in order to get back to Charlottesville, we split into two groups to ascend the mountain.  From the Harper's Creek Shelter, at 1860 feet elevation, we ascended 2100 feet to the top of Three Ridges over 3.5 trail miles.

Mark and I spent much of our time talking about his experience as a Boy Scout Scoutmaster in Florida, and how he believes that setting the example by cleaning up along the trail "pays it forward" and encourages others to make the same efforts.

Including stops, it took 2 hours and 21 minutes to the top from the shelter.  We stopped several times for photos and to re-hydrate.  It was hot - probably in the 80's, and the views were incredible and meant to be savored.
Stopping for lunch after crossing over Three Ridges, on left.
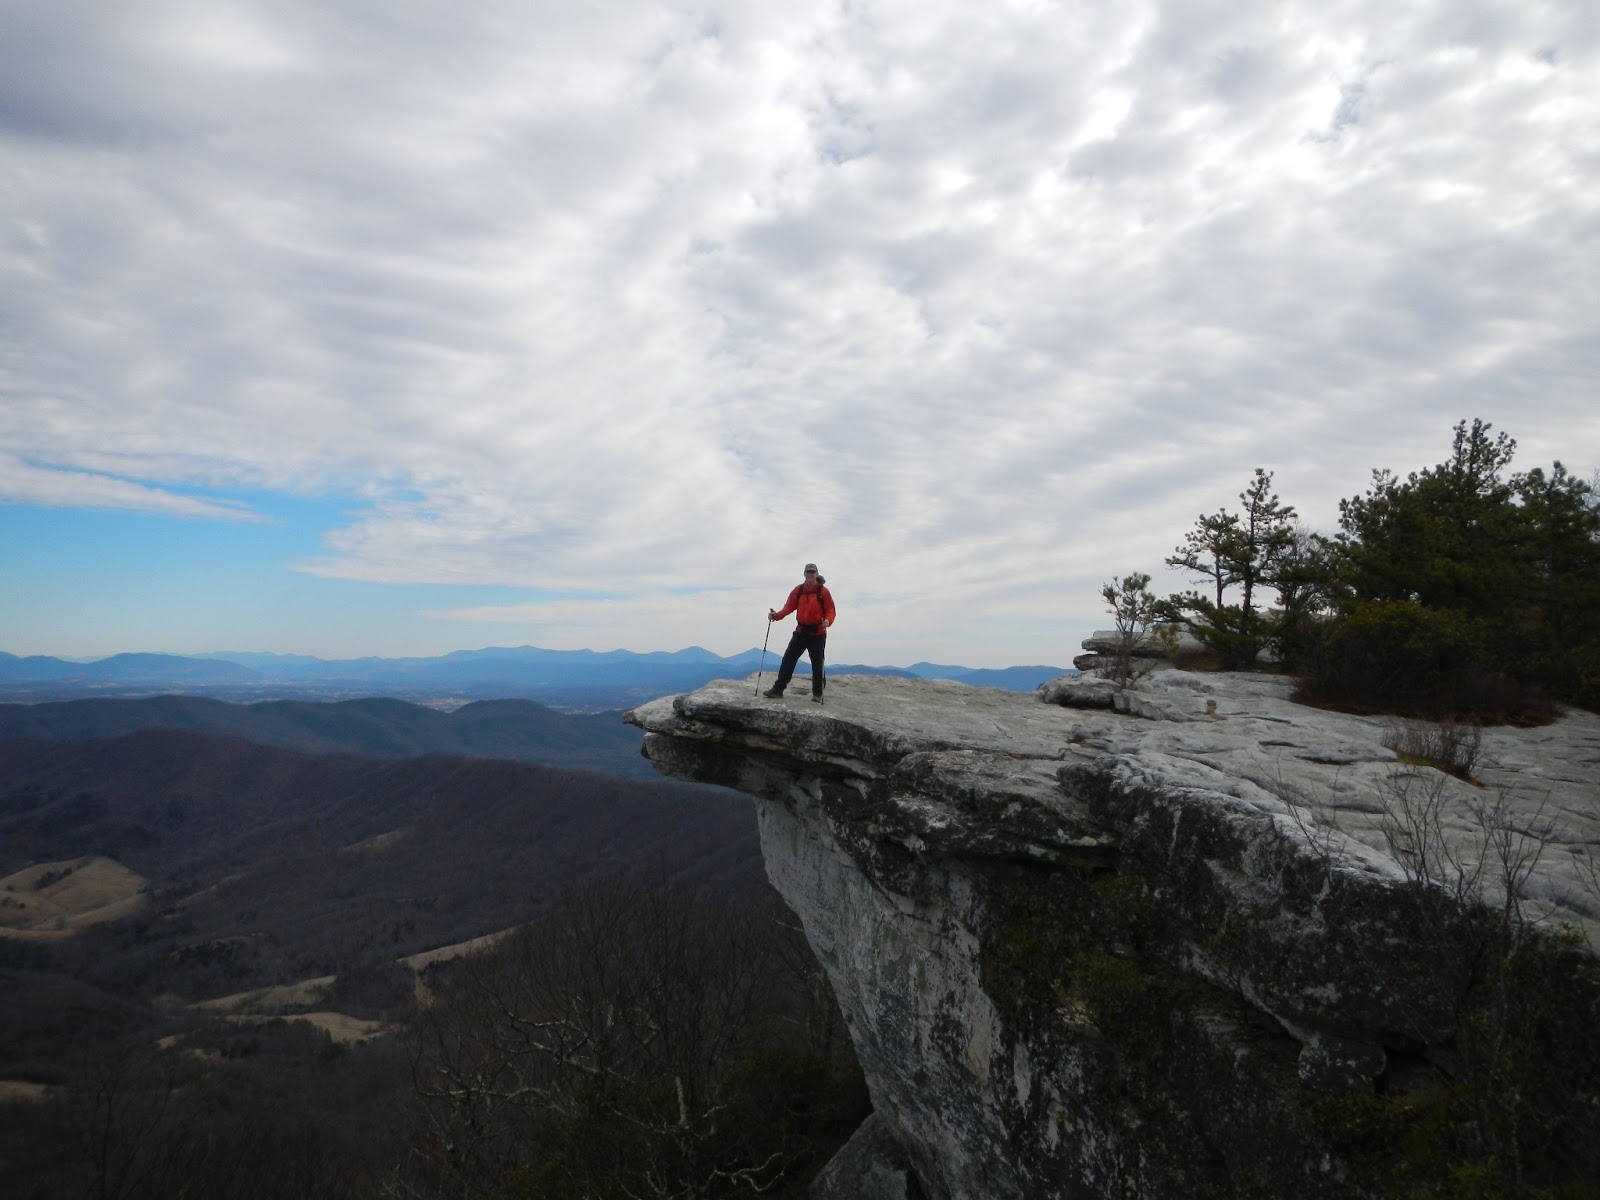
The World as Viewed from Hanging Rock.
 Despite the heat (or maybe because of it), the hike was a humbling experience.  When I last hiked this section of trail three years ago, I hiked a 13 mile loop in 5 hours and 12 minutes on a cool, overcast late May day not conducive to stopping at overlooks.  I don't have the GPS data from the previous hike so I cannot compare individual sections, but I know I did not feel the muscle soreness near the top of the mountain that I felt this time.

As a result, I decided to hike the shorter hike using a car drop, remembering that looping back to the start via the Mau-Har Trail is longer and involves a steep uphill climb a couple of miles down the trail.
Taking a break near the Maupin Field Shelter.
My hope was that the shorter hike and car shuttle would get me back in time to take my son to his baseball game.  No such luck.  We finished our 11.2 mile hike at 3:15, which was nearly 7 hours after our 8:20 AM start, with almost exactly 5 hours spent hiking.  When moving, we probably didn't go a lot slower than my previous hike pace (13 miles in 5 hours, 20 minutes), but the heat contributed to additional stops.
For those who want to experience some of Three Ridges Wilderness without the tough climb, perhaps with younger hikers, there is a relatively unknown way to do this in a pretty easy manner.  Taking the Blue Ridge Parkway south from Reid's Gap to Love Gap, a spot which is signed on the BRP, a hiker can take an old road east to the Maupin Field Shelter.  I wouldn't do this without the A.T. Map that accompanies the Central Virginia Guide, the Trails Illustrated Map #789, or PATC Map #12. (Generally, the PATC map contains the best detail, but the latest version of the map also shows some stray roads in Three Ridges that do not exist.  I still recommend it for the best detail of this area.)  This road meets the Maupin Field campsites near the kiosk shown above after 1.5 relatively flat miles - you can see a trail sign describing the road in the photo above.  From Maupin, it is 2.1 trail miles and an 850 foot ascent, first over Bee Mountain, then up part of Three Ridges to Hanging Rock, site of the vistas we experienced at lunch and the photos above.  The hike would be a total of 7.1 realtively easy miles.  And the views are well worth it!  


Hike Details.
PATC Difficulty Factor 312.9
Distance:  11.2 miles
Total Time: 6 hours 56 minutes.
Lowest point: 955 ft.
Highest point: 3938 ft.
Total uphill: 4735 ft.

Sunday, April 7, 2013

Appalachian Trail over Humpback Mountain with the Boy Scouts

April 6th was a perfect hiking day, with blue skies, temperatures in the 50's, and a slight breeze.  Perhaps that explains the best turnout ever for any of the series of Appalachian Trail hikes I have been leading for my son's Boy Scout troop.  Joining us were 19 scouts (including one from another troop in Maryland) and 10 adults. One of the adults was a last minute addition, because he said his wife told him he needed to get more exercise.

Troop 1028 hikes consecutive sections of the A.T. every other month, and April was our third hike in this series.

Or maybe the turnout was because the April hike was shorter than our usual 10 mile length.  We need to go ten in order to qualify for Hiking Merit Badge.  This month's shorter hike was  used instead to qualify our newer scouts for a Second Class Rank Requirement, which reads as follows:

1a.
Demonstrate how a compass works and how to orient a map. Explain what map symbols mean.
1b.
Using a compass and a map together, take a five-mile hike (or 10 miles by bike) approved by your adult leader and your parent or guardian.
Scoutmaster Pete had those guys taking coordinates of many landmarks along the way!

We started out at the Humpback Rocks Parking Area, which is on the Blue Ridge Parkway about five miles south of where the BRP meets Shenandoah National Park's Skyline Drive.  The name of the parking area refers to the destination rocks, which are high on Humpback Mountain and are undoubtedly the top hiking attraction in the area.  The A.T. went through the parking lot until about 10 years ago, when the trail maintaining organization rerouted the path further east, away from the crowds accessing the trails to these rocks and their views.

As a result, we hiked the old Howardsville Turnpike to the A.T. then climbed Humpback Mountain on the A.T.  The old A.T. route takes a fit hiker up to the rocks in about 20 minutes, but it is very steep.  The new route is considerably longer and mellower up the mountain.  Our scouts chose to detour off of the A.T. so they could experience the rocks (a steep downhill from the A.T.), and the photos here come from that spot.  It took us 3.6 miles of hiking to get to the rocks on the A.T.


After a break, we continued south on the A.T.  The best view was across a valley to the Wintergreen Ski Area which, on April 6th, was experiencing its final day of skiing for the season.  Wintergreen had both the latest opening and the latest closing in its history, which should tell you how bizarre this past winter has been in Virginia.

We passed our original stopping point, the Humpback Picnic Area, because it was gated.  But I recounted to everyone who would listen my memory of that spot when I first hiked this part of the trail, nearly 20 years ago.  I didn't want to do an out-and-back hike, and this trail is not a part of any loop trails.  So I backpacked my Rollerblades and skated down the Blue Ridge Parkway back to the car.  But I didn't research it very well, and discovered just how steep the BRP can be.  Flying down the road on my Rollerblades, I thought for sure I was going to kill myself.  I ended up buying a new brake after that 3 mile journey.  Never again!

We ended where the A.T. crosses the BRP at Dripping Rocks, virtually in the backyard of a Wintergreen condo.  Our next section will be the A.T. from here past Reed's Gap to the Maupin Field Shelter, before we take an old road out to the BRP.  Then the boys have to contend with Three Ridges, and then the Priest.  These guys have no idea what they are in for!